
In this article
Ordering a replacement SEG graphic is a measurement job before it is a print job. SEG — silicone edge graphics — is a tensioned fabric graphic with a sewn silicone edge (keder) fitted into a matching aluminum frame channel. If the dimensions are off, the fabric will not tension flat or the bead will not stay seated in the groove.
This guide explains how to measure SEG frame dimensions accurately when ordering a replacement fabric graphic. If you are still comparing display hardware, see our SEG Lightbox vs. Pop-Up Display Guide.
1. What you need before you measure
You need a steel tape measure showing both inches and millimeters, a notepad or phone to record numbers as you go, and a camera for close-up photos. A cloth tape can stretch and give a false reading, so always use a rigid steel tape. For large-format frames, bring a second person: one holds the zero end flush against the corner while the other reads the measurement.
Before you measure, note the installed orientation — which edge is the top, and whether the frame hangs in landscape or portrait orientation. The aluminum frame, not the old fabric, is your primary measurement source.
2. Step 1 — Measure the frame width and height
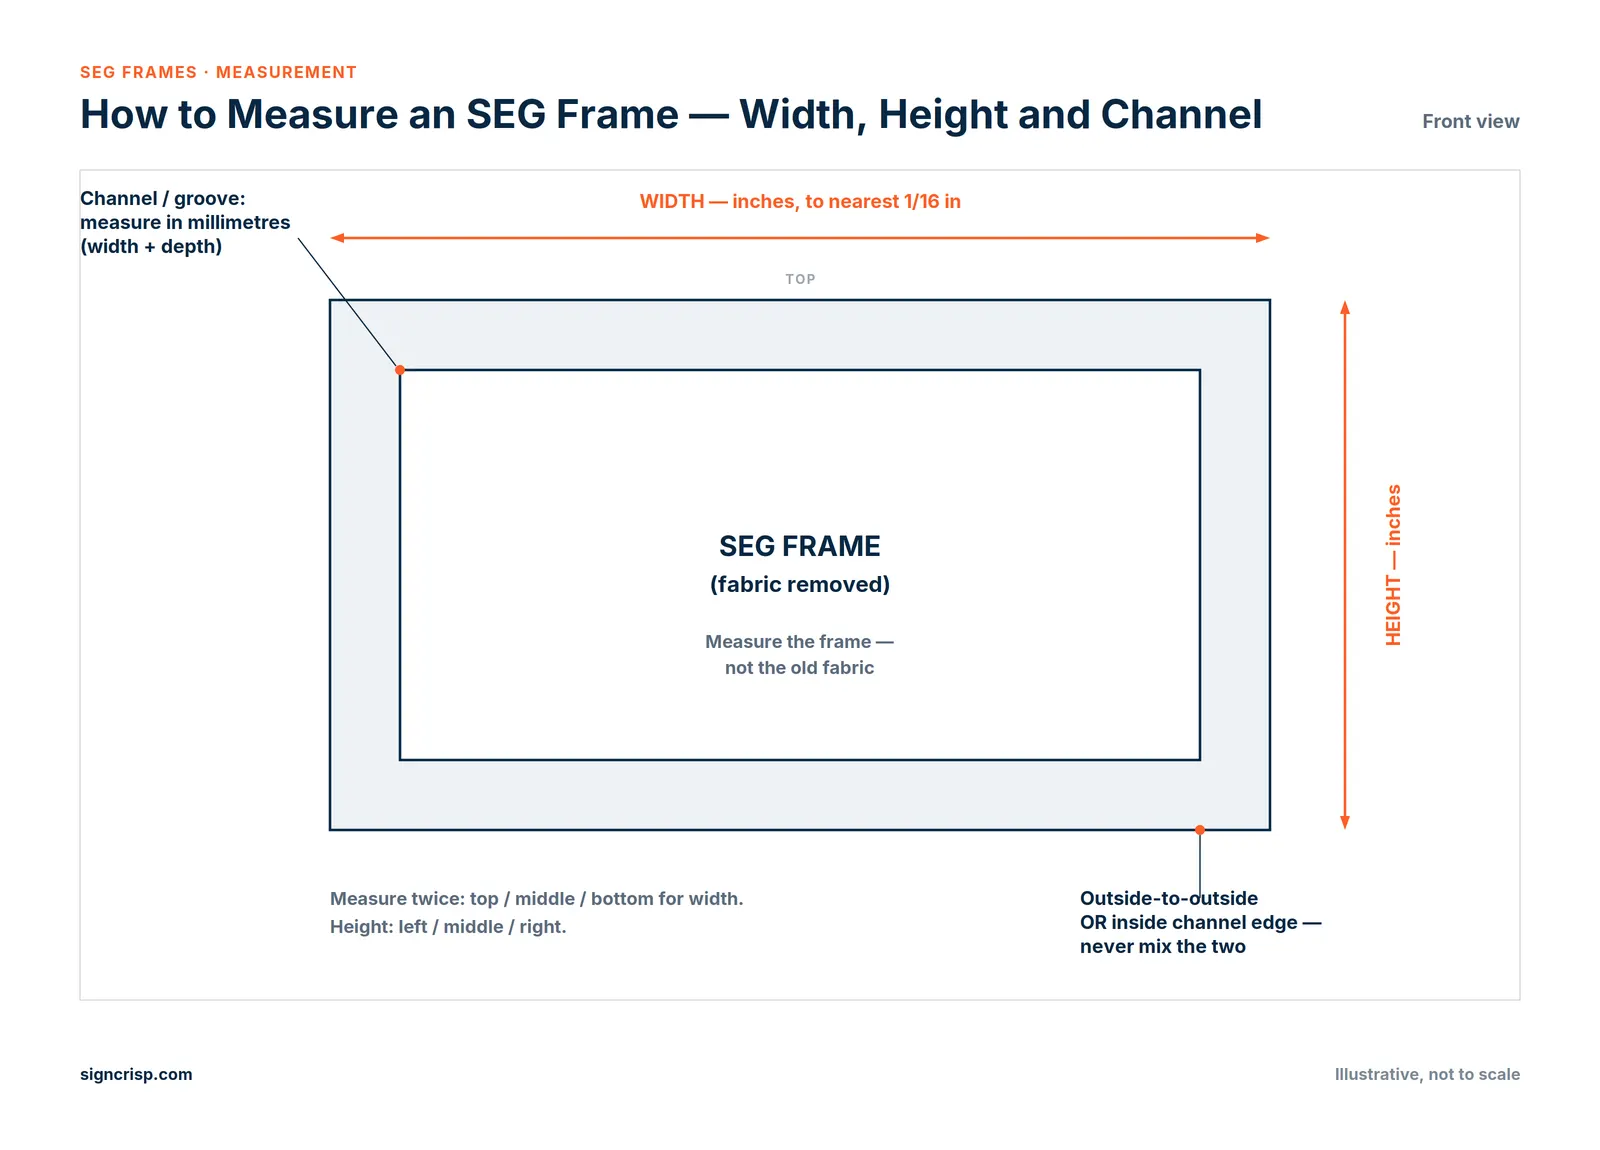
Measure the rigid aluminum frame, not the old fabric. Extruded aluminum does not stretch, shrink, or relax the way polyester fabric does. Measure width and height in inches to the nearest 1/16 inch, and use millimeters for the perimeter channel.
There are two industry methods to specify an SEG frame size: outside-to-outside (outer frame edge to outer frame edge) or inside-to-inside (inner channel edge to inner channel edge). Use the exact same method for both width and height, and tell SignCrisp which method you used — mixing an outside width with an inside height describes a frame that does not exist.
Measure twice in three locations: width across the top, middle, and bottom; height down the left, middle, and right. If large frames bow slightly in the center and readings differ, record all three figures.
3. Step 2 — Measure the channel and silicone bead (keder)
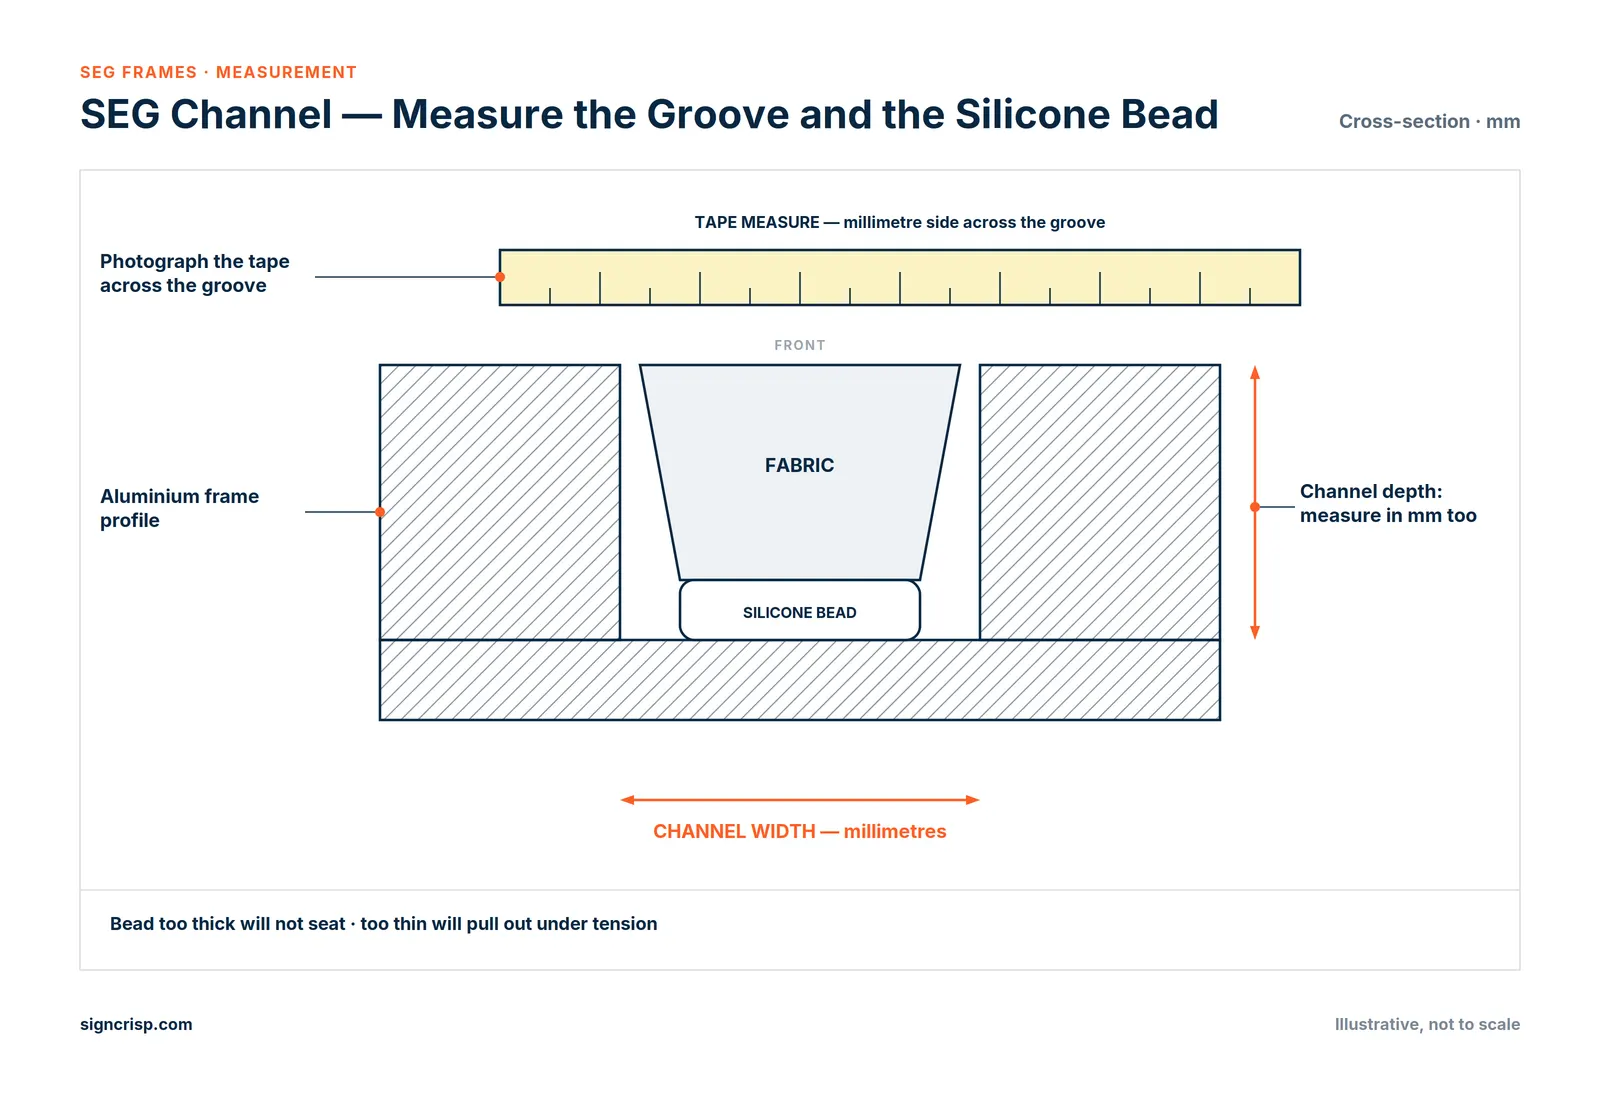
Measure the extrusion channel width and depth—along with the silicone bead (also called keder in the trade) on your existing graphic—in millimeters across the groove opening and down to the base of the channel.
Keder thickness varies by frame manufacturer (common industry profiles include 3 mm × 12 mm and 3 mm × 14 mm), so never assume a bead from one frame system will fit another. A silicone strip that is too thick will not seat into the groove, while one that is too thin will pull out under fabric tension. Photograph your tape measure across the groove with the millimeter markings clearly readable.
4. Step 3 — If you only have the old graphic
Sometimes the frame is mounted out of reach and only the old print is on hand. You can measure the existing fabric graphic, but treat it as a secondary reference and state this clearly when placing your order.
Lay the fabric completely flat on a clean, hard floor or table. Never measure it while hanging, folded, or bunched. Smooth the textile gently without pulling or stretching it. Measure edge-to-edge in inches to the nearest 1/16 inch—excluding the sewn silicone bead—across two or three spots for both width and height, then measure the keder width and thickness separately in millimeters.
5. What to send SignCrisp with your order
SignCrisp fabricates custom replacement SEG graphics for both our own LED lightboxes and compatible third-party aluminum frames. Because the visible opening size alone is not enough to guarantee a drum-tight fit, include the complete measurement set below with your inquiry:
| Item | What to send | Why it matters |
|---|---|---|
| Frame size | Inches (to 1/16 in), measurement method + orientation | Sets the exact finished graphic size |
| Channel width & depth | Millimeters + photo of tape across the groove | Confirms the silicone keder will seat cleanly |
| Silicone bead (keder) | Millimeters (thickness × depth) + close-up photo | Matches bead profile to your frame manufacturer |
| Brand / profile | Frame brand or extrusion model (or “unknown”) | Helps cross-check standard extrusion specs |
| Lighting & environment | Front-lit, backlit, or non-lit; indoor vs. outdoor | Determines backlit vs. blockout fabric selection |
| Reference photos | Full frame, corner joint close-up, channel close-up | Verifies corner miter style and groove geometry |
| Artwork file | Print-ready PDF/TIFF with 0.5″–1″ bleed (Section 7) | Prevents production delays during prepress |
Measurement record — copy and fill in:
Discover products
 Custom Vinyl BannersCustomize
 Custom Feather FlagsCustomize
 Custom Rectangle Flag with Pole & Water Base – 23.6" × 63"Customize
 Custom Retractable Banner Stand – Silver Aluminum Roll-UpCustomize
- Frame width: ______ in (outside-to-outside / inside channel edge)
- Frame height: ______ in (outside-to-outside / inside channel edge)
- Channel width: ______ mm
- Channel depth: ______ mm
- Silicone keder bead width: ______ mm
- Frame brand / profile: ______
- Lighting type: Front-lit / Backlit / Non-lit
- Orientation: Landscape / Portrait
- Measured from: Rigid aluminum frame / Old fabric laid flat
6. Common measurement mistakes that cause a reprint
Most replacement graphic reprints trace back to a few preventable errors:
| Mistake | What happens | Fix |
|---|---|---|
| Measuring only the visible opening | Graphic is cut too small to reach the groove | Measure outer frame or channel edge (Step 1) and state method |
| Mixing outside-to-outside with inside-to-inside | Graphic fits neither dimension accurately | Use one consistent method for both width and height |
| Rounding to the nearest half inch | Loose, sagging fabric or over-tight corners | Measure to the nearest 1/16 inch |
| Measuring old fabric while hanging or stretched | Distorted dimensions from fabric tension | Lay flat on a hard surface, smooth gently, exclude keder |
| Guessing channel size from brand name alone | Silicone bead may pop out or refuse to seat | Measure groove and bead in millimeters with photo proof |
| Swapping width and height | Landscape artwork printed for a portrait frame | Always write Width × Height and mark the top edge |
| Submitting numbers without reference photos | Prepress cannot verify groove lip or corner style | Attach wide, corner, and millimeter-tape close-up photos |
7. Bleed and artwork: the 0.5–1 inch SignCrisp SEG bleed rule
Getting the frame measurement right is half the job; preparing the canvas correctly ensures the graphic tensions cleanly without white edges.
Under the SignCrisp Artwork & File Prep Guidelines, extend all background colors and imagery 0.5 to 1 inch (1.3 to 2.5 cm) beyond the finished graphic size on all four sides. This bleed zone tucks into the perimeter channel during installation and is for background continuation only—keep all headlines, logos, QR codes, and borders well inside the visible safe area.
8. FAQ
Do I measure the visible opening or the frame? Measure the rigid frame, not the visible opening. The visible opening is only the inner lit area; a graphic trimmed to that dimension will fall short of the perimeter channel.
What if I don’t know the frame brand? Send your measurements and close-up photos anyway. While a brand name is helpful, exact frame dimensions in inches, channel and keder measurements in millimeters, and clear tape-measure photos give our engineers everything needed to match your profile.
Can I measure the old fabric instead? Yes, as a backup option if the frame is inaccessible. Lay the old graphic flat on a hard surface without stretching it, measure edge-to-edge excluding the silicone bead, and measure the keder separately in millimeters. Let us know your figures came from the fabric.
How exact must the channel measurement be? Exact to the millimeter. Because keder profiles vary between 3 mm and 4 mm in thickness and 10 mm to 14 mm in depth, a clear millimeter reading and photo across the groove ensure the replacement edge locks in under tension.
9. Get a replacement-graphic quote from SignCrisp
Once you have your frame dimensions, millimeter channel readings, and reference photos, email the completed checklist from Section 5 along with your artwork to hello@signcrisp.com, message us on WhatsApp at +852 6995 1502, or submit your project via our Contact page.
SignCrisp fabricates custom aluminum LED lightboxes and replacement SEG graphics at our 150-person Guangzhou facility. Our engineering team reviews prepress inquiries within 12 hours, with standard production in 4–7 business days, DDP door-to-door delivery in 7–12 business days, and a 3-day replacement guarantee for shipping damage or print defects.